In today’s digital age, millions of people are in the online market to sell their products. WooCommerce is the top choice for most people when it comes to starting an online business. It’s a top-notch e-commerce plugin for WordPress that helps newcomers establish and run their stores efficiently. For starters, adding products in WooCommerce can be a challenge.
But you don’t have to worry; you are at the right spot. This article will be your complete guide on how to add products in WooCommerce. But first, let’s get a sneak peek of what WooCommerce is.
What is WooCommerce?
WooCommerce converts a traditional WordPress site into an e-commerce store that can perform all of its necessary functions. With WooCommerce, you can make selling goods and services on your website simple and inexpensive. It enables you to sell digital and physical things, process payments safely, manage inventory, and automatically organize all of your tax filings.
The fact that the same firm that owns WordPress.com also owns WooCommerce, ensures seamless integration between the two platforms.
Let’s see why you should consider WooCommerce as your online store.
Why create your online store with WooCommerce?
A wide variety of e-commerce plugins are available; so, what makes WooCommerce the best option?
To make this choice easier for you, WooCommerce provides owners of WordPress websites with an unequaled level of functionality, customization, and ease of use. But before we go any further, let’s look at the advantages of using WooCommerce.
1. Price
When deciding on a platform, the cost is likely one of the most critical factors for a new store.
There is a wide range of prices for e-commerce plugins, from zero to thousands of dollars per year; however, the price difference is sometimes equivalent to the application’s performance. Because of this, the fact that WooCommerce is completely free to use is the primary argument in favor of using it.
2. Quick and easy installation
The installation of WooCommerce is very similar to any other plugin installation. You can find and download this plugin from the WordPress Plugin Directory, which you can access through the WordPress Admin.
After installing the plugin, proceed by following the directions provided by the wizard. To assist you in configuring your online shop, the wizards will lead you through a series of questions you must answer and you will be good to go in no time.
3. Out-class Content Management System
Content management is essential to your store’s growth when selling any product online. When it comes to content, WooCommerce is not lacking in any way, which is precisely what you would expect from an e-commerce program built on the world’s most widely used content management system (CMS).
E-commerce marketing, sales enhancement, and search engine optimization rely heavily on optimizing content for maximum effectiveness. WordPress and WooCommerce are two platforms that work together to provide a wide range of options for content management.
The possibilities include blogs, landing pages, digital marketing, and product specifications. Retailers have an easier time optimizing their products for search results thanks to search engine optimization (SEO) plugins compatible with WooCommerce, such as Yoast WooCommerce SEO.
4. Ready to sell package
To cut it short, let’s discuss WooCommerce’s best feature: it is an all-in-one ready-to-sell package for its users. All the essentials are available for the new store owner to be up and running a successful online business. These include:
- 100+ payment gateways
- Numerous shipping methods
- Readily configurable themes for both big-screen and mobile devices
- Reliable sales, purchases, refunds, and inventory management
- Step-by-step guidelines for beginners
Until now, we have learned about the salient features of WooCommerce. The types of products you can add will be discussed further in the article.
Product types
Before we indulge in the process of adding products in WooCommerce, let’s take a glance at the different product types.
1) Simple
Incorporates the vast majority of the products that you might potentially sell. Simple products are straightforward and have no alternative variations. An example of this would be a novel or research paper.
2) Virtual
A virtual product does not need to be shipped. For example, you can take any online service. When this is turned on, it disables all of the fields connected to shipping, including the package size. A virtual product will also prevent the shipping calculator from being enabled in the shopping cart or throughout the checkout process.
3) Downloadable
Triggers the activation of additional fields where you can give a file your customer can download. Customers who have completed a purchase are sent an order confirmation email that contains a link to a file that the customer can download. This would work well, for instance, for a PDF magazine, a digital photo album, or a picture.
4) Group
A collection of related products that a customer can purchase independently if desired. For example, a dinner set includes dishes, glasses, cups, and cutlery.
5) Affiliate
An affiliate product is one that is available for purchase elsewhere but is listed and described on your website instead.
6) Variable
A variable product comes in multiple iterations, each with its own distinct SKU, price, stock option, etc. Take, for example, shoes available in several different colors and sizes.
7) Others
Extensions typically bring about the addition of new types. For example, the WooCommerce Bookings and WooCommerce Subscriptions plugins each bring a new category of products to the table.
Now that we learned about the product types in WooCommerce. Next, we will discuss how to add products to WooCommerce.
How to add products in WooCommerce
As mentioned earlier, WooCommerce stands out as one of the best online store creation and management systems. In many ways, adding products in WooCommerce is just like adding a WordPress post.
As mentioned before, WooCommerce categorizes products into Simple, Grouped, External/Affiliate, and Variable categories to simplify the process of systematically adding and managing products to your store. There are both virtual and downloadable products available. You can add, edit, or remove products whenever you like and for any reason.
First, we’ll explain the steps for any product you want to add and the details for specific products. Let’s begin.
Add a new product in woocommerce
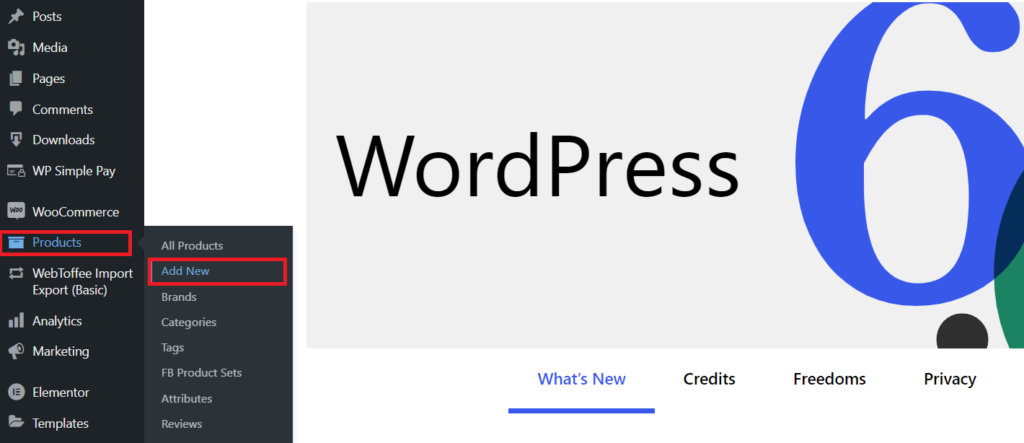
To add a product, select Products from the menu on the left, then select Add New from the submenu that appears.
You should now see the product page in front of you. On this page, you can directly input all of the product attributes, like the Product name, and also give a detailed description to illustrate to a potential buyer what you are offering here.
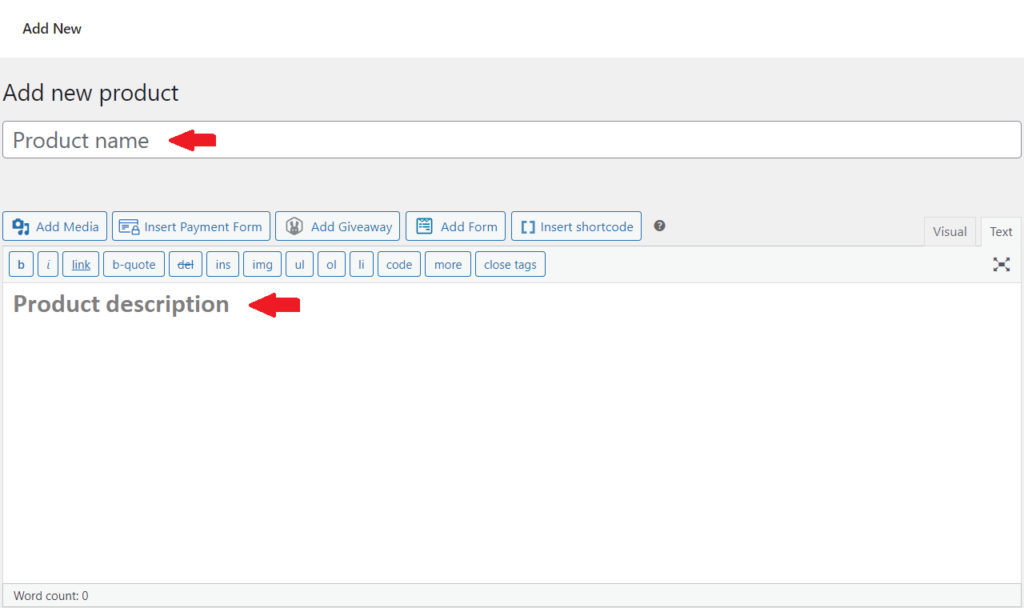
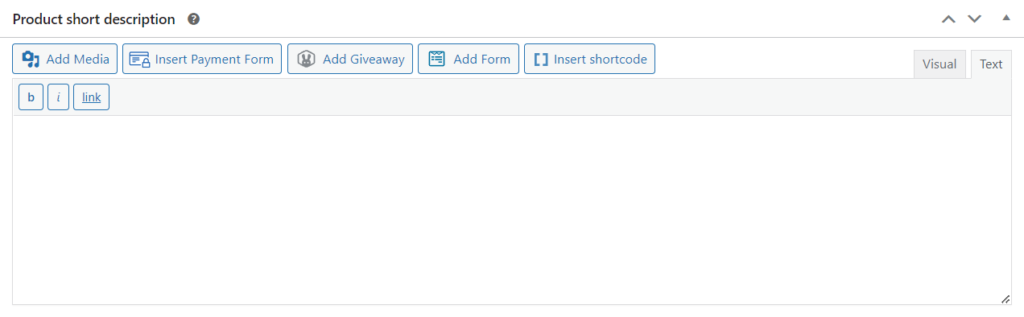
This description will be displayed on the product’s landing page, generally in the Product Description tab. In addition to that, you can also write a short description as well. This one is undoubtedly briefer, giving a summary of the product.
If you look below the main description box, you will find the short description. Additionally, it is displayed in shop listings on other site pages wherever the relevant product is revealed.
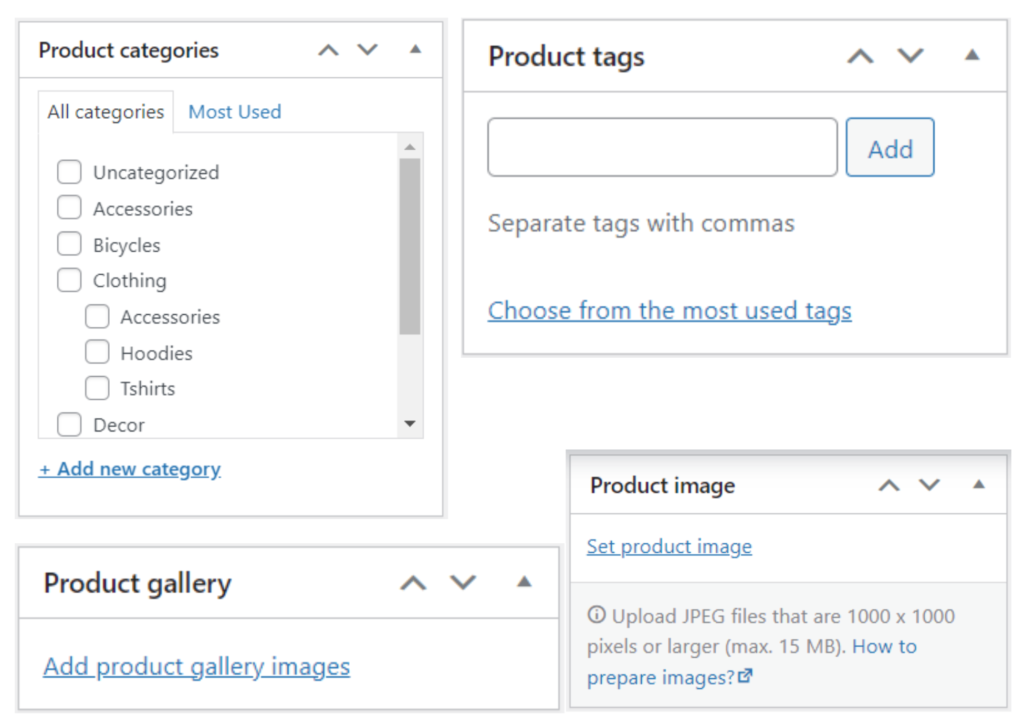
Next, you need to add some information in the boxes on the right side of your screen. It includes Product categories, tags, images, and a gallery. You can add this general information to any product regardless of the type you are trying to add.
Next up, we will look at how to add simple products in WooCommerce. For demonstration, we’ll take product type as a simple product and discuss its input fields in detail.
Adding a Simple product
You can find the Product Data Meta Box at the bottom part of the page. This is where you set up your product’s basic information, such as its type, price, available stock, dimensions, attributes, and stock management.
Now let’s have a detailed look at these settings.
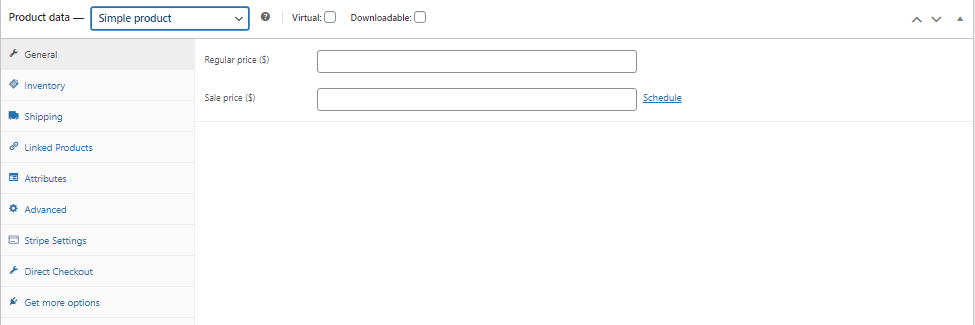
General
In General, you will find two boxes, Regular price and Sale price. You can set a schedule for the sale price here as well.

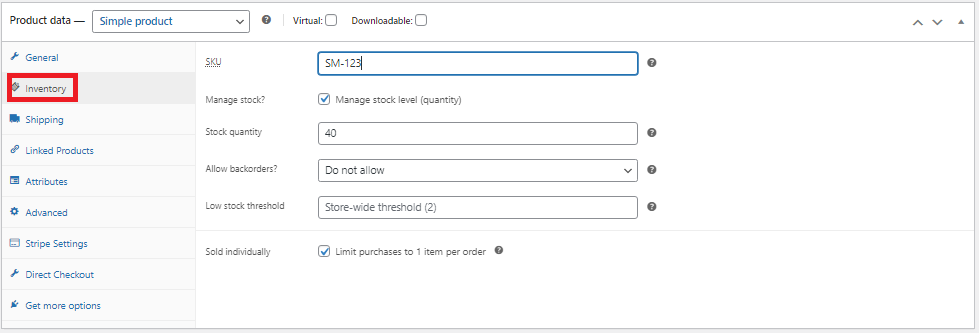
Inventory
In the Inventory section, you need to add essential data related to your product. The SKU (Stock keeping unit) is a number given to every product. You have to enable stock management to manage stock automatically. If not, you will be responsible for updating the inventory manually.
If you enable stock management, you have to provide stock quantity, select whether to allow backorders, enter a number for a low stock threshold, and limit purchases to one order.
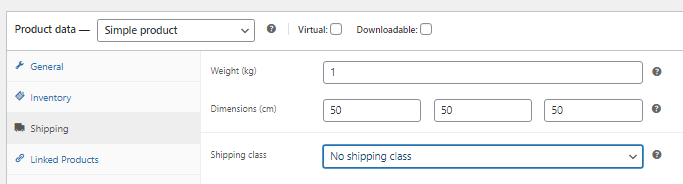
Shipping
In the shipping section, you must add the product’s weight, dimensions including length, height, and width, and the shipping class. This information is used to determine the shipping cost.
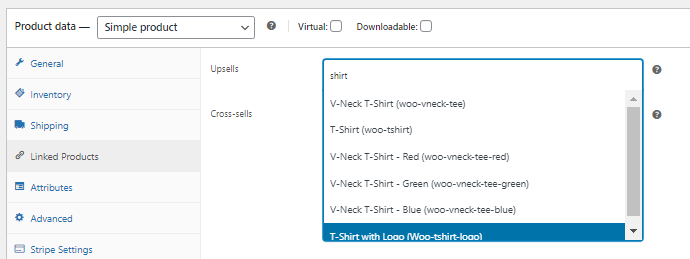
Linked Products
Linking some of your products can be a great way to boost sales. You can link your products on two levels in the “Linked Products” section. If you set the Upsells option for a product, its product page will have a “You may also like” section with all the related products you have selected. For example, a customer looking at a shirt may want to see a matching tie next to it.
Cross-sells are the other type of link. Like Upsells, this feature tries to get the user to buy another related or similar item. If you choose this option, a link to cross-sells will show up on the shopping cart page when checking out.
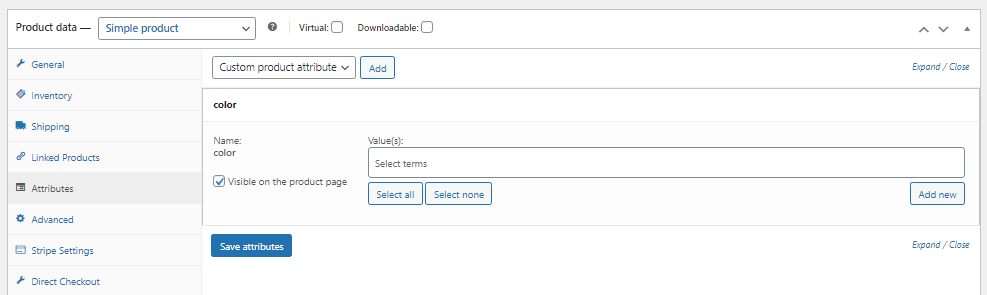
Attributes
You can assign previously defined attributes to the specific items in the Attributes section. For instance, if you sell a shirt in two colors, you may add the attribute “color” to the wallet.
Once you’ve picked an attribute from the list, click “Add” to give the product the terms that go with that attribute. The attribute won’t appear on the front end if you don’t check the “Visible on the product page” box.
By choosing Custom product attributes from the dropdown menu, you can add unique attributes to your product. These are added at the product level and won’t be available in layered navigation or other products.
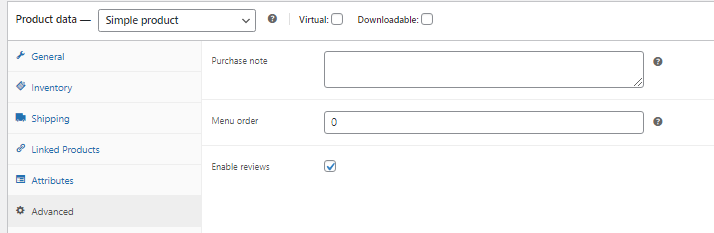
Advanced
In the Advanced section, you can add a Purchase note, menu order for custom ordering position, and enable or disable reviews for your product.
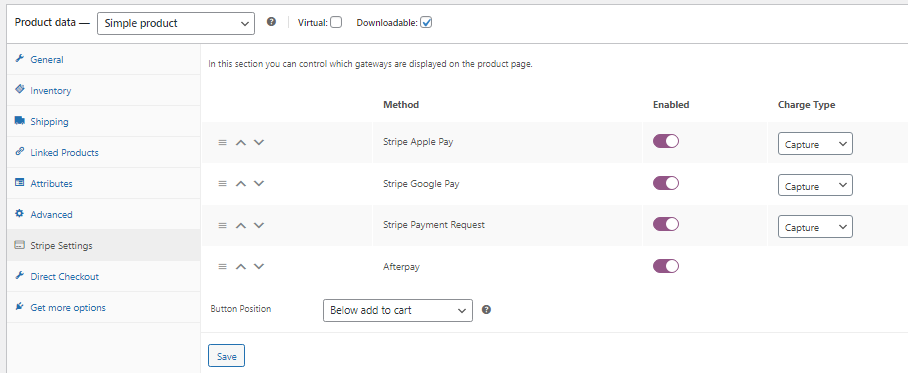
Stripe setting
In the Stripe setting, you can choose different payment methods, including Stripe Apple Pay, Stripe Google Pay, Stripe payment Request, and Afterpay.
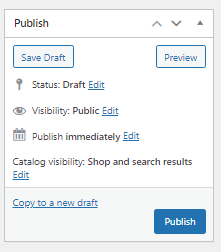
Publishing a product
Once you’ve provided all the information about your product, you’re ready to publish it. But there are still a few settings to look at.
Three options in the Publish section are similar to the WordPress post editor.
Catalog visibility
You have to pay attention to this feature while organizing a product because this feature will decide how this product will be seen in response to searches. There are four options when you click on Edit for the Catalog visibility.
If you click on shop and search results, your product will be displayed everywhere, including search results, shop page, and category pages.
If you choose Shop only, your product won’t appear in search results. It will only appear on the category page and the shop page.
If you choose Search results only, your product will be visible only in search results, not category and shop pages.
The Hidden option will make your product visible on the single product page, not on other pages.
You can also choose whether the product is promoted as a Featured Product in product categories, upsells, and related products.
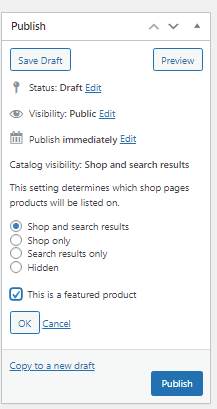
After you have configured all the settings, you can preview your product before publishing. After rechecking all the product data click on
Publish. That’s it! Your product is now live and ready to earn you some revenue!
BONUS: How to add products in bulk in WooCommerce.
If you have a lot of products in a CSV file or excel sheet and you want to add them to your WooCommerce store, it’s not practical to manually enter each product and its details. There are different plugins with which you can easily upload all of your products and product types simultaneously, whether they are simple, variable, grouped, or external.
You can add bulk products to WooCommerce using two methods.
1. Using built-in CSV importer
To use the CSV importer, you must first export your WooCommerce products as a CSV file. Go to WooCommerce > Products to do this. Select Export at the top of the Products page. You can choose which file type to export and which fields to include on the Export Products page.
Then, open the CSV file in a text editor like Microsoft Excel or Notepad++. Here you will add the relevant information for the bulk products. Ensure that each column is correctly labeled and all the information about your products is entered correctly. After ensuring everything is correct, please save the file and add it to your WordPress site.
When adding products in bulk to WooCommerce, be careful of the maximum number of products you can add simultaneously. You should add many products in smaller batches to avoid timeouts or other complications.
Go to WooCommerce > Products. On the Products page, choose Import from the menu bar. Select your CSV file on the Import Products screen, and then click Upload File and import. Review the import choices and then click Import. In the following screen, map the columns of your CSV file to the appropriate product fields, then click Continue.
All your products will now be imported to your WooCommerce store immediately.
2. Use WP All Import Plugin
You can use a plugin like WP All Import if you don’t like the default CSV importer. It is a powerful plugin that can easily import products from a CSV file. This plugin also works well while importing big or complex files.
First, install and activate the plugin. After activation, go to WP All Import > New Import. Next, select Upload a file, click “Select File,” and choose your CSV file. Once done, click on “Upload File and Continue.”
After this, “WP All Import” will upload your CSV file. Next, you’ll have to fill the columns in your CSV file with the right product information. To do this, choose each field from the dropdown menu and select the column header from your CSV file corresponding to that field. Click “Continue” when all of your fields are entered correctly.
The import process will begin now. All your products will now be imported automatically into your WooCommerce store.
Conclusion
In this article, we have discussed WooCommerce and its salient features, why it is essential to create an online store with WooCommerce, and how to add products to WooCommerce.
There are some of the essential things that every WooCommerce admin should set when adding products. Firstly, you must know the type of product to go with it. As the right classification will help you sort the inventory as well as help the customers find the item they need.
Next is the complete set of information regarding the product, as this will make your store look legit and the decision-making easier. We hope you found this article helpful. If you liked it, let us know in the comment section below.
Meanwhile here are a few other posts you might also be interested in:
