Gutenberg has many excellent features, one of which is Reusable Blocks. Basically, Gutenberg allows you to save your block layouts as reusable blocks and later use them directly anywhere on your site as well as on other WordPress websites. Pretty cool, right? So, how do you create reusable blocks in Gutenberg? That’s easy. In this article, we will teach you how to add Reusable Blocks to Gutenberg.
But first, let’s better understand what are reusable blocks and how we can benefit from them. Let’s dive in.
What are Reusable Blocks?
Reusable Blocks were first introduced as part of the Gutenberg Editor with WordPress 5.0 in 2018. A Reusable Block refers to a collection/arrangement of one or more Gutenberg blocks that you can save in your library for later use. It can be an image, button, paragraph, or anything you want to save for later use on other areas of your website.
Once you have created a reusable block, you can add it to other parts of your website with just a single click instead of creating the whole layout again and again. Moreover, if you make any changes in one instance of reusable block, the changes are immediately reflected on all other instances. Thus, there is no need to manually modify each block individually.
Examples of Reusable blocks
Here are some scenarios where you can improve your efficiency using reusable blocks.
- Save and quickly reuse identical tables.
- Add a call-to-action button on all your pages and post.
- Add an About the Author section at the end of every page.
- Ask your readers to Leave a Comment at the end of your blog.
- Add a Feedback form to multiple pages with a single click.
How can we benefit from Reusable Blocks?
Reusable Blocks are a great solution to stop repeatedly performing the same tedious actions. For instance, if you are a blogger or web designer, you might want a weekly highlight that appears on each post and gets updated with new content. reusable blocks are the best solution to your problem. They’ll save you a lot of time and ensure that none of your older pages include content that is no longer up to date.
Here are some more benefits of adding reusable blocks to Gutenberg.
- You can design the basic layout for items such as forms, quizzes, surveys, etc., and save them as reusable blocks. Once created, you can add them to any part of your site and edit them as necessary.
- Similarly, you can save complex tables and later add them anywhere you want via reusable blocks, as tables are not easy to create.
- Moreover, reusable blocks allow you to include call-to-action buttons to create impactful web pages easily.
- Additionally, using reusable blocks, you can add affiliate banners or advertisements on most of your posts and pages without much effort.
- Last but not least, you can export and import reusable blocks to use them on multiple WordPress sites.
So, by now, you have seen several ways to use WordPress reusable blocks to simplify your work and maintain consistency across your website. Now, let’s move on and see how we can add Reusable Blocks to Gutenberg.
How to Add Reusable Blocks to Gutenberg?
Before you can add reusable blocks to Gutenberg, you have to first create some reusable blocks. Let’s start with that.
Create Reusable Blocks with Gutenberg
Let’s create a post first. From your WP Admin Dashboard, go to Posts > Add New. Alternatively, you may edit an existing post as well. For that, you need to go to Posts > All Posts. Hover over the post you wish to edit until the Edit option appears. Click on Edit to edit your post.
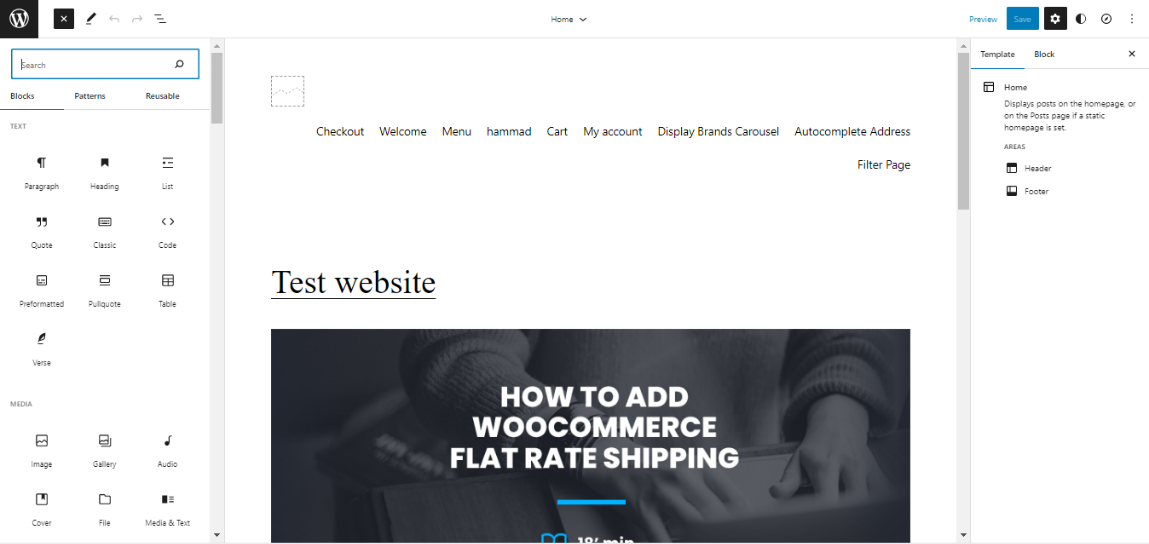
Okay, so now we are into the post editor, which is, of course, the Gutenberg editor. Now, you may start adding the content to your post. To add a WordPress block, click on the (+) icon on the top-left. Now find the block you are looking for and drag it to the page area to add it to your page. Similarly, you can add multiple blocks to create your desired layout.
Once you’re done, select the layout or block you just made. Click the three dots in the toolbar, and then click on Add to Reusable Blocks.
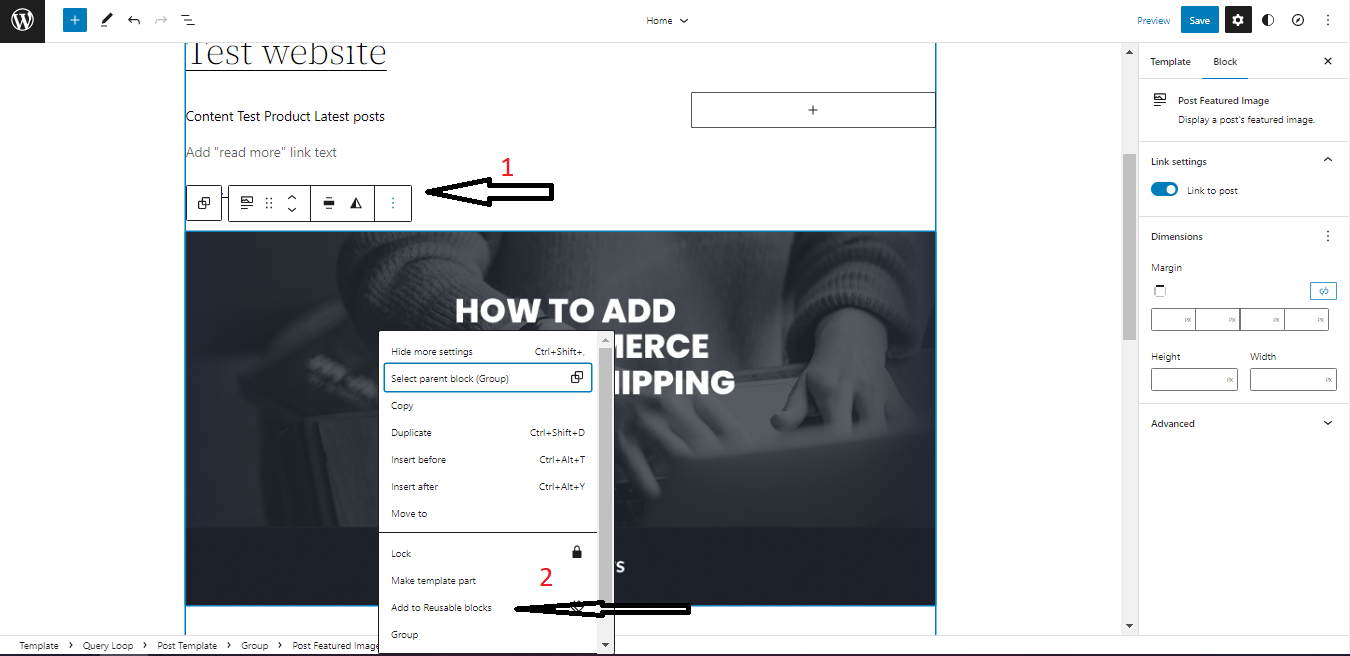
After that, a dialog box will pop up where you can enter a name for the reusable block you have just created. When you want to use the block again in the future, you must search for it with the same name.
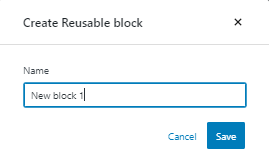
Once you have given a name to your block, click on the Save button, and you are done creating a reusable block in Gutenberg. A notification will appear on your screen once the reusable block is saved.
Similarly, you can create as many reusable blocks as you wish. Next up, let’s add Reusable Block to Gutenberg posts and pages.
Add Reusable Blocks to Gutenberg Posts and Pages
To find your reusable blocks, click on the (+) icon in the screen’s top left-hand corner. Now go to the Reusable tab, where you will discover all of the blocks you have previously saved. Now, just like with any other block, you can simply click it or drag the block to the page area to add it.
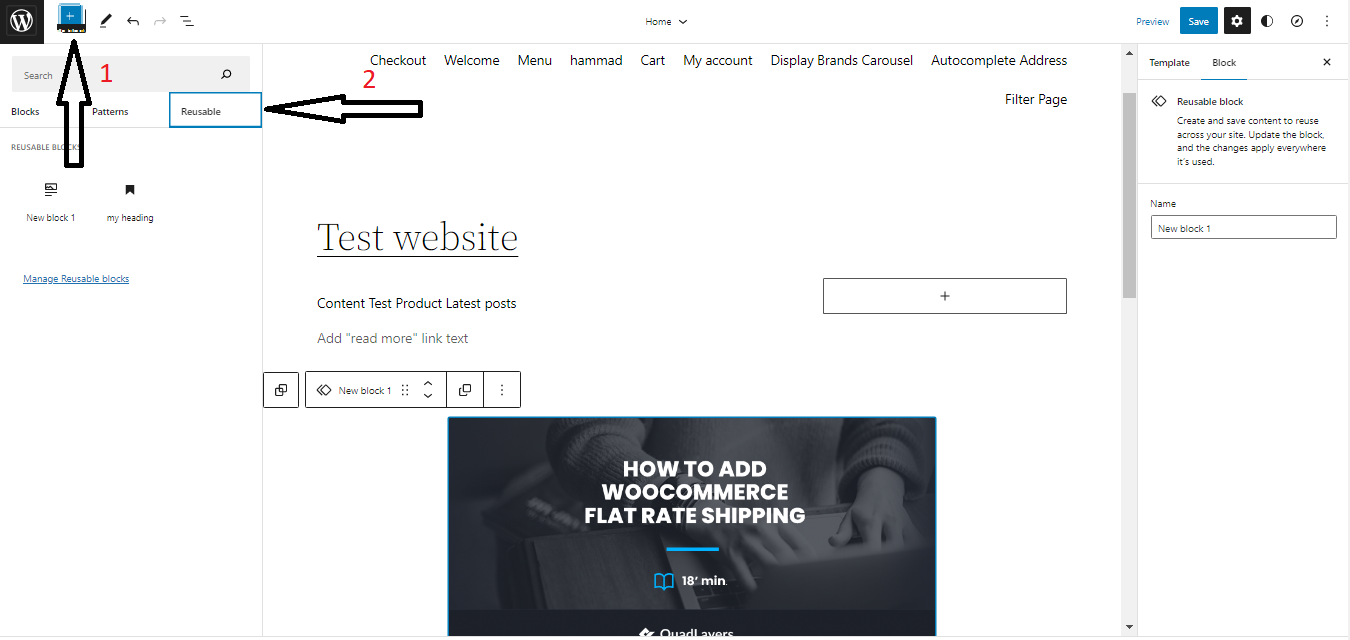
Moreover, if you are looking for a particular block and know its name, you can search for it by typing its name into the search box. However, just be aware that the search feature now includes blocks from the WordPress block directory created by third parties, which can be helpful.
Above, we have seen how to create and add Reusable Blocks to Gutenberg posts or pages. Let’s see how you can modify the contents of a reusable block when needed.
Edit Contents of a Reusable Block
We can edit the content of a reusable block in two ways. First, we can make global changes to the reusable block that apply to all instances of that reusable block. Secondly, we can convert the reusable block into a regular block, so any changes made will only apply to that particular block.
Edit as Reusable Block
The benefit of using reusable blocks in WordPress is that you can make changes to one instance of the reusable block, and they’ll be reflected on all other instances immediately. You will find it advantageous as you don’t have to make changes everywhere you have used that particular block. But then you must be very careful while making any changes as they’ll affect all the other instances.
Now, to edit a reusable block, you don’t have to do anything extra. Just edit the content of the reusable block just like any normal block. And any changes you make will be reflected everywhere on that reusable block throughout the entire site.
Converting into a regular block
Oftentimes, you may need to modify a particular instance of a reusable block without affecting other occurrences. The good news is you can convert the reusable block into a regular block, and it will get disconnected from the rest of its counterparts. That way, any changes you make will only apply to this particular block.
To accomplish this, select your reusable block and click on the three dots icon to reveal the menu. Now, click on the Convert to Regular Block option from the drop-down menu. It will transform the reusable block into a regular block. You can now make changes to this block just like any regular block without affecting the reusable block.
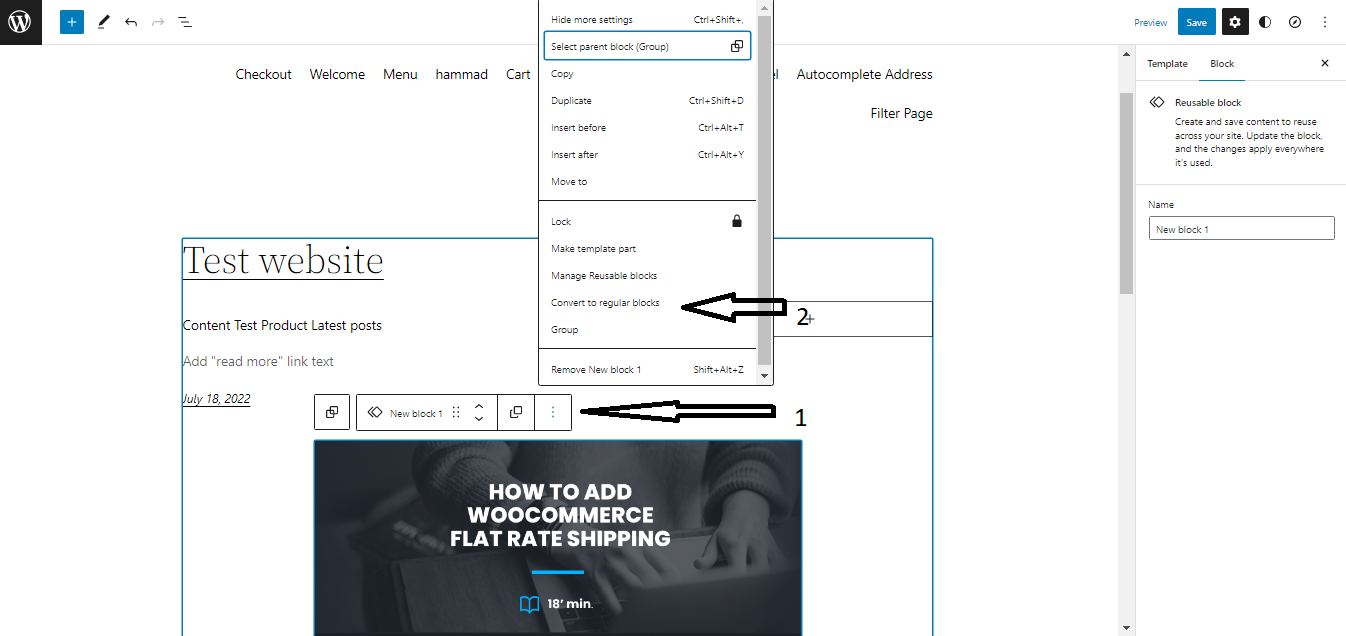
So, up till now, we have successfully added reusable blocks to Gutenberg posts and have seen how to edit them. Since we can create multiple reusable blocks, we should be able to manage all of them from a single interface. So, let’s see how to manage all reusable blocks.
Manage All Reusable Blocks
Once you start using Reusable Blocks, you’ll find yourself saving blocks quite often so that you don’t have to create identical blocks repeatedly. Over time, you may realize certain reusable blocks are no longer needed while some of them require updating or renaming.
Luckily, the Block Editor allows you to handle all of the reusable blocks you have added to WordPress from a single interface. Additionally, the process is pretty straightforward. It gives you access to all of your saved blocks, where you can organize and manage them as needed.
To manage your blocks, go to the top left-hand corner, click on the (+) icon, and then go to the Reusable tab. Inside the Reusable tab, select the option to Manage all Reusable Blocks.
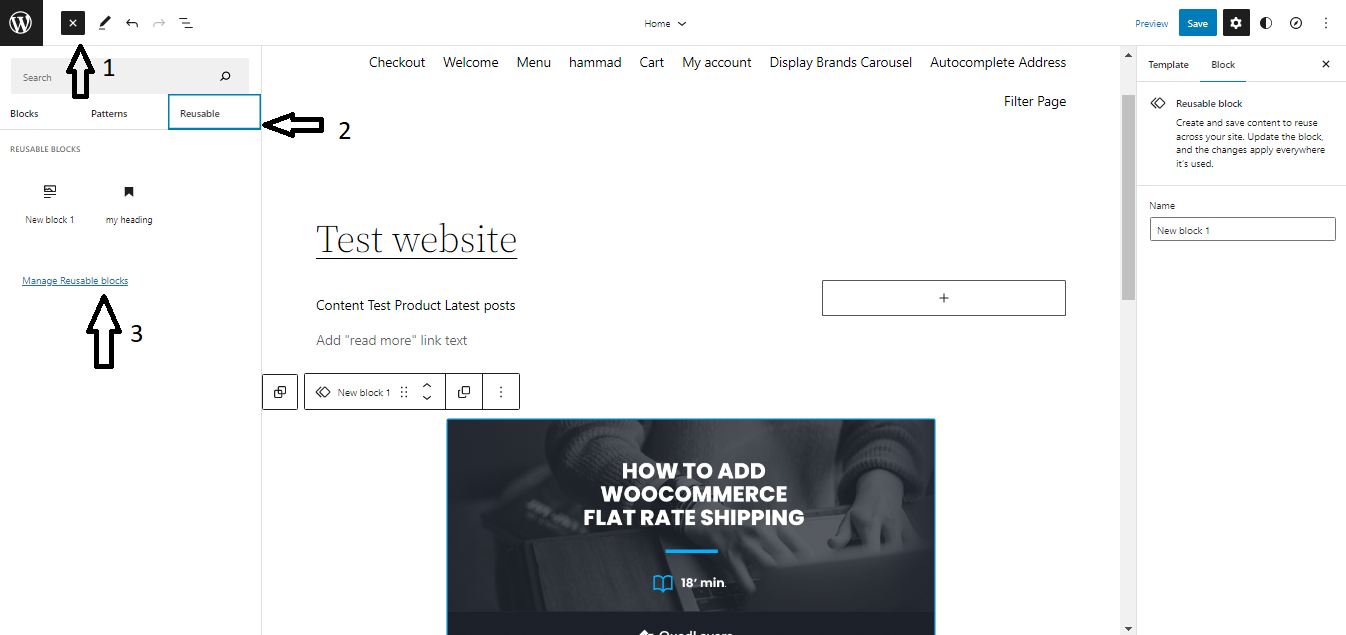
When you follow the link, you’ll be redirected to the page where you will find all your reusable blocks in one place. Here, you can import/export your reusable blocks. Moreover, you can edit your reusable blocks and even delete the ones you no longer need.

Import and Export Reusable Blocks
As described before, once you have created a Reusable Block, you can use it on any other site powered by WordPress. To do that, first, you have to export your blocks from the website where you created them. Afterward, you can import these blocks on any other WordPress site and then use them as explained in the above sections. This is very helpful if you manage multiple sites powered by WordPress.
Export as JSON
From the Gutenberg editor, click on the (+) icon and go to the Reusable tab. Now click on the Manage all Reusable Blocks option, which will take you to a new page where you can manage all your reusable blocks.
Now, hover over the block you wish to export and click on Export as JSON to complete the process. That’s it. Your JSON file will start downloading immediately.
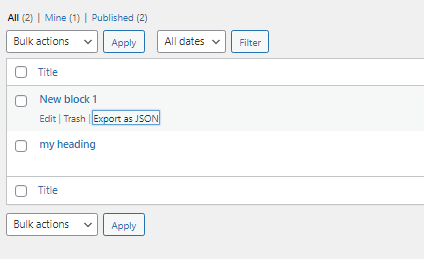
Import from JSON
To import Reusable Blocks from a JSON file, navigate to the Manage all Reusable Blocks interface, following the same steps explained above. Here, click on the Import from JSON button and choose the JSON file you just downloaded. Once done, click on Import to start importing the reusable blocks.

That’s it; you can now successfully export and import a Reusable Block from a JSON file. Similarly, you can export/import as many blocks as you wish.
Conclusion
A Reusable Block is one of the most valuable features of Gutenberg. Reusable Blocks save you a lot of time and effort while creating a WordPress site. For instance, you can create a call to action button, table, forms, etc., and reuse them multiple times on your website while maintaining a consistent design. Moreover, once you have created a reusable block, you can import/export it as a JSON file, allowing you to use it on any WordPress website.
In this article, we have discussed how to add Reusable Blocks to Gutenberg. We started with creating a reusable block using the Gutenberg editor. Next, we learned how to add reusable blocks to Gutenberg posts or pages. Moreover, we also saw how to edit these reusable blocks as is or by converting them to a regular block. Further, we learned about managing all reusable blocks from a single interface. Lastly, we rounded off by exporting and importing reusable blocks as JSON files.
I hope this article helped you understand how to create and add reusable blocks to Gutenberg. Have you tried adding reusable blocks to Gutenberg before? How was your experience? Let us know in the comment section below.

