If you’re new to Gutenberg or still getting used to Gutenberg, you might find some difficulty getting used to the new blocks and how differently they function from the Classic Editor. One common issue we’ve seen multiple users mention is broken blocks in the Gutenberg editor. They want to know why that happens and how they can fix these broken Gutenberg blocks. Thus, we’ve brought you our complete guide on How to Recover Broken Gutenberg Blocks.
But, before we go into the potential fixes, first, let’s look at Gutenberg blocks and why Gutenberg blocks can break sometimes. Let’s find out.
What are Gutenberg Blocks?
Let’s talk about Gutenberg Blocks first. Gutenberg blocks allow us to create specific content sections in our WordPress posts and pages and customize them individually. What this means is that, unlike the old classic editor, we can customize each part of our content uniquely compared to the rest of the content.
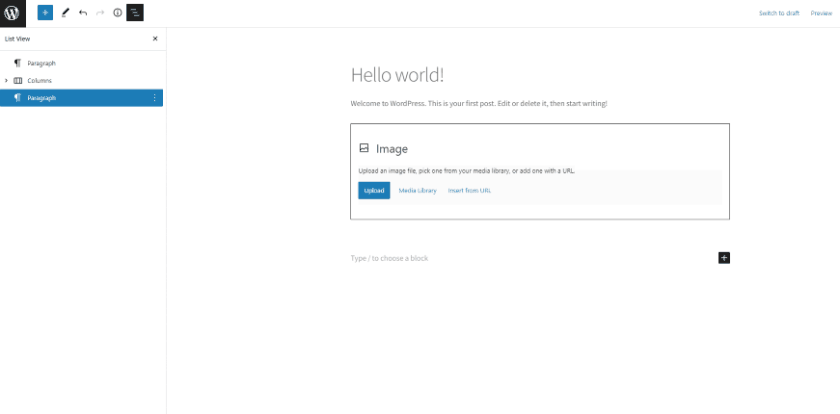
So, for example, we can have an individual paragraph block or media block, or even third-party widgets with different styling, and create unique page formats by combining blocks into columns. You can even add individual blocks and code them individually using HTML codes defined for that block specifically.
Additionally, Gutenberg block also supports drag and drop content editing, so you can create specific content blocks and move them around all over your post. However, Gutenberg’s block design isn’t without its fair share of compatibility and code issues. This is where broken blocks come in.
Reasons for Broken Blocks in WordPress
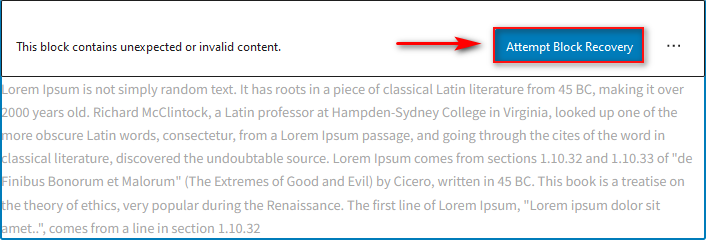
You might have seen some broken blocks in WordPress if you have used Gutenberg for a while. This usually shows up like this on your block editor:

There could be a few reasons why you might see a broken block in your posts:
- Incompatibility with the HTML editor. Content of a bock might get into conflict with the HTML editor, which fails to render the block properly. As a result, the block appears broken.
- Possible mistakes in your code if you used the HTML editor or the code editor.
- Compatibility issues with other plugins.
- An update to WordPress or Gutenberg might have broken it.
Although you will see less and less of these broken blocks with recent updates to Gutenberg, it is a good idea to learn how to fix them. This is why we’ve brought you our guide on how to fix broken blocks in Gutenberg. Let’s look at the easiest way to do so first.
How to Recover Broken Gutenberg Blocks?
First, look at the manual process of recovering broken Gutenberg blocks. The easiest step is letting Gutenberg fix your blocks using the Attempt Block Recovery button.
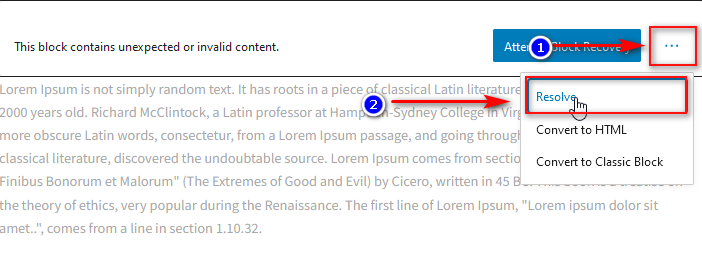
1) Attempt Block Recovery
Once Gutenberg detects a broken block, you should see an Attempt Block Recovery button. This button will automatically try and detect issues with your HTML code and fix it by itself. Simply click the button, and wait and see how it fixes your broken block.
This mostly works for simple issues, but if the issue is much more complex and requires manual code changes, this might not work for you. So, let’s look at the other methods you can use to fix broken blocks in Gutenberg.
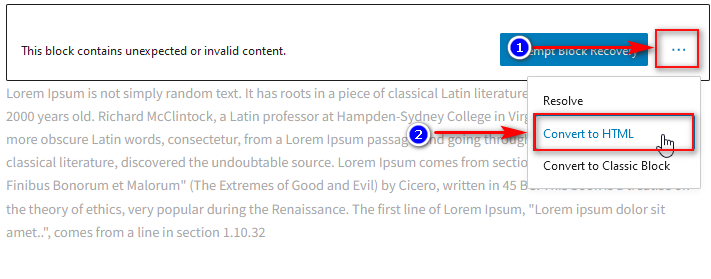
2) Convert to HTML
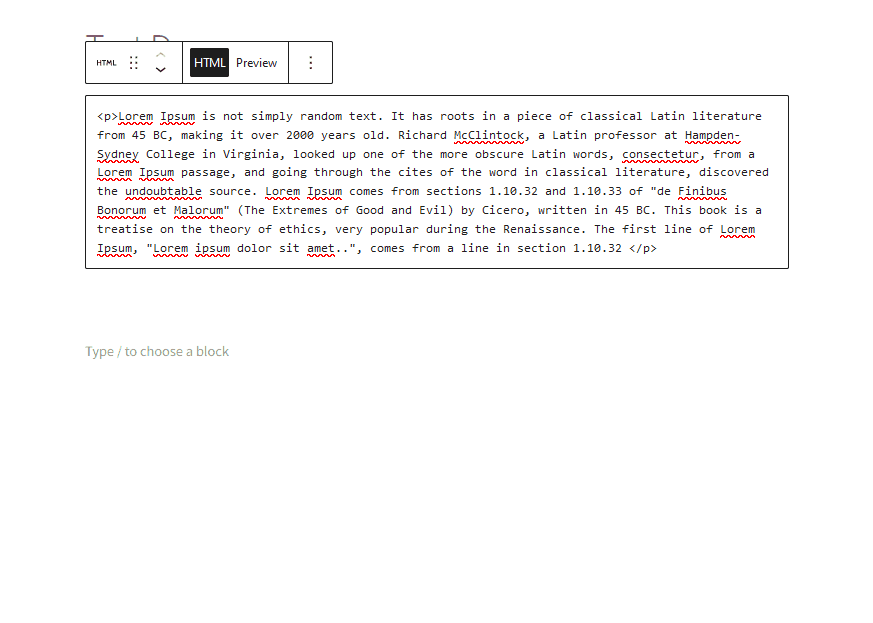
Clicking on the three dots next to Attempt Block Recovery and then clicking on Convert to HTML will let you manually resolve your block’s coding using HTML instead. The HTML editor also comes with a preview button to check if the issue is resolved as you fix it. This way, you can manually find the issue with your code and fix it.
Afterward, click on three vertical dots next to the editing bar and click on Convert to Blocks. Once the issue is resolved, you will see a fully functioning block on your page.
3) Convert to Classic Block
Sometimes, the issue with broken blocks might come due to your switch from the Classic Editor to the Block Editor. This is usually due to either compatibility issues between the two editors or the use of a shortcode or additional plugin features that Gutenberg is not compatible with.
In any case, you can always change your Gutenberg block back to the Classic editor to resolve this issue easily. Click on three dots again and click on Convert to Classic block. This will change the entire block to a mini classic editor that you can easily use to configure the whole block.

4) Using the Resolve feature
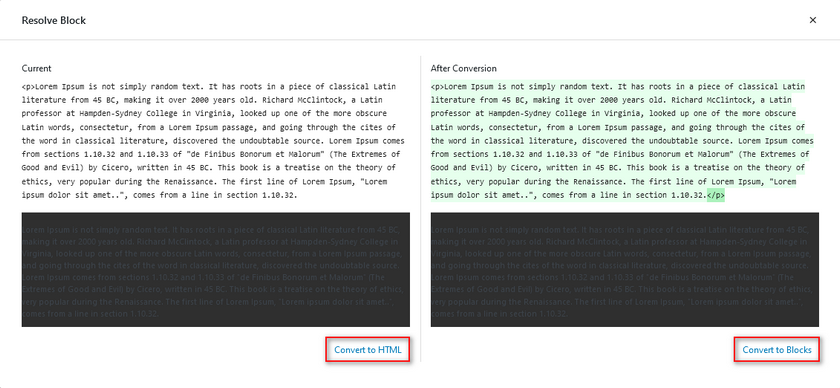
To fix or recover broken Gutenberg blocks, you can also use Gutenberg’s Resolve feature. This feature provides you with the option to convert your entire content to a block or to HTML. You can also see the changes before and after the conversion to see what part of your content changes.
To fix your broken blocks using this feature, click on the three dots next to your block and then click on Resolve.
You will see a pop-up window with two options side by side; Convert to HTML and Convert to Blocks. Clicking on Convert to HTML simply switches to the code editor where you can manually fix the issue, whereas clicking on Convert to blocks will let Gutenberg automatically fix the issue based on the recommendation it gives you.
Recover All Broken Blocks at once Programmatically
Now, all the above steps let you resolve or fix your broken blocks individually, but if you have more than a few broken blocks on your page, fixing them all individually might be quite tricky. Moreover, if your page has tons of content and you’re dealing with dozens of blocks or even more than 100 blocks, this might be pretty time-consuming.
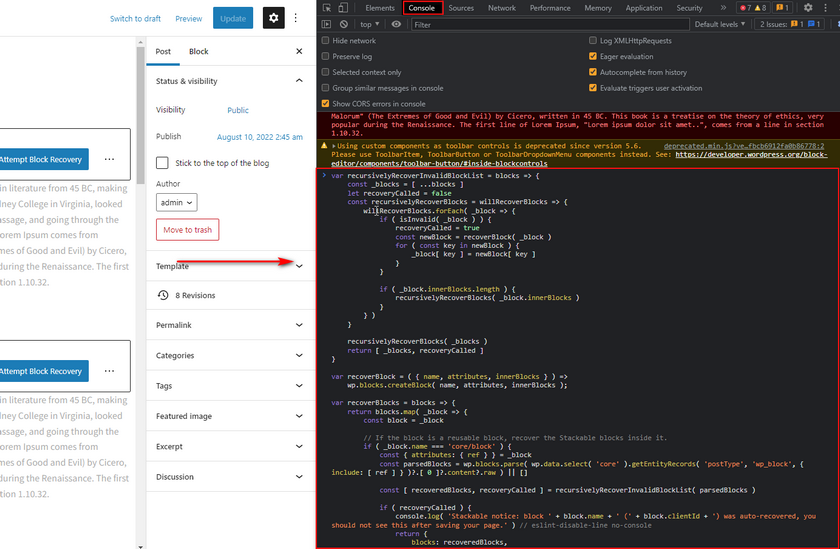
Well, if that’s the case for you, worry not; You can also choose to recover all the broken blocks in your Gutenberg editor programmatically. This requires you to use your browser’s developer console to paste some javascript code.
First, open your browser’s developer console. For Windows, this shortcut will be CTRL + SHIFT + J, while for Mac, this shortcut will be CMD + OPTION + J.
Then, simply paste the following lines of code to your console and press Enter.
var recursivelyRecoverInvalidBlockList = blocks => {
	const _blocks = [ ...blocks ]
	let recoveryCalled = false
	const recursivelyRecoverBlocks = willRecoverBlocks => {
		willRecoverBlocks.forEach( _block => {
			if ( isInvalid( _block ) ) {
				recoveryCalled = true
				const newBlock = recoverBlock( _block )
				for ( const key in newBlock ) {
					_block[ key ] = newBlock[ key ]
				}
			}

			if ( _block.innerBlocks.length ) {
				recursivelyRecoverBlocks( _block.innerBlocks )
			}
		} )
	}

	recursivelyRecoverBlocks( _blocks )
	return [ _blocks, recoveryCalled ]
}

var recoverBlock = ( { name, attributes, innerBlocks } ) =>
	wp.blocks.createBlock( name, attributes, innerBlocks );

var recoverBlocks = blocks => {
	return blocks.map( _block => {
		const block = _block

		// If the block is a reusable block, recover the Stackable blocks inside it.
		if ( _block.name === 'core/block' ) {
			const { attributes: { ref } } = _block
			const parsedBlocks = wp.blocks.parse( wp.data.select( 'core' ).getEntityRecords( 'postType', 'wp_block', { include: [ ref ] } )?.[ 0 ]?.content?.raw ) || []

			const [ recoveredBlocks, recoveryCalled ] = recursivelyRecoverInvalidBlockList( parsedBlocks )

			if ( recoveryCalled ) {
				console.log( 'Stackable notice: block ' + block.name + ' (' + block.clientId + ') was auto-recovered, you should not see this after saving your page.' ) // eslint-disable-line no-console
				return {
					blocks: recoveredBlocks,
					isReusable: true,
					ref,
				}
			}
		}

		if ( block.innerBlocks && block.innerBlocks.length ) {
			const newInnerBlocks = recoverBlocks( block.innerBlocks )
			if ( newInnerBlocks.some( block => block.recovered ) ) {
				block.innerBlocks = newInnerBlocks
				block.replacedClientId = block.clientId
				block.recovered = true
			}
		}

		if ( ! block.isValid ) {
			const newBlock = recoverBlock( block )
			newBlock.replacedClientId = block.clientId
			newBlock.recovered = true
			console.log( 'Stackable notice: block ' + block.name + ' (' + block.clientId + ') was auto-recovered, you should not see this after saving your page.' ) // eslint-disable-line no-console

			return newBlock
		}

		return block
	} )
}

// Recover all the blocks that we can find.
var mainBlocks = recoverBlocks( wp.data.select( 'core/editor' ).getEditorBlocks() )
// Replace the recovered blocks with the new ones.
mainBlocks.forEach( block => {
    if ( block.isReusable && block.ref ) {
        // Update the reusable blocks.
        wp.data.dispatch( 'core' ).editEntityRecord( 'postType', 'wp_block', block.ref, { content: wp.blocks.serialize( block.blocks ) } ).then( () => {
            // But don't save them, let the user do the saving themselves. Our goal is to get rid of the block error visually.
            // dispatch( 'core' ).saveEditedEntityRecord( 'postType', 'wp_block', block.ref )
        } )
    }

    if ( block.recovered && block.replacedClientId ) {
        wp.data.dispatch( 'core/block-editor' ).replaceBlock( block.replacedClientId, block )
    }
} )
The code essentially automatically uses the Attempt block recovery feature for all your broken blocks without you needing to click on anything manually. However, that’s also the limitation of the above code snippet. If the issue is anything complex that requires your attention, the code above might not be able to fix it automatically. In that case, you’ll have to attend to those blocks yourself.
Once you’re done, update your page/post, and you will see your changes accordingly.
BONUS: How to Activate Full Site Editor in WordPress
Additionally, if you want to use block editing to customize your entire website from a single interface, you can do so using the Full Site Editor. This is a relatively new feature provided in WordPress 5.9 and above. However, this feature isn’t necessarily activated by default. So let’s take a look at how you can enable the full site editor for your website.
To use the full site editor on your WordPress site, you must be using a dedicated compatible block-based Full Site Editing theme. Once you install and activate a block-based theme that uses the Gutenberg editor, you will have access to the full site editor that you can use to configure your entire website using blocks.
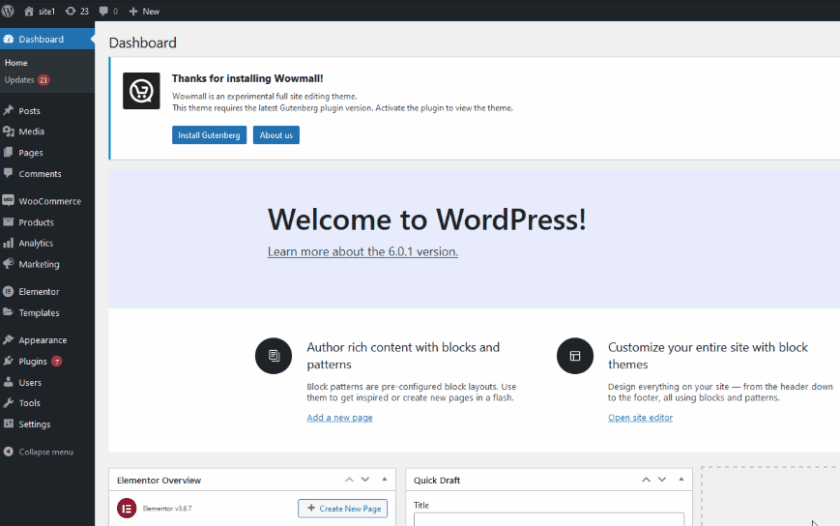
So, go ahead and install a block-based WordPress theme like WowMall, Blockpress, or the default Twenty-Twenty Two.
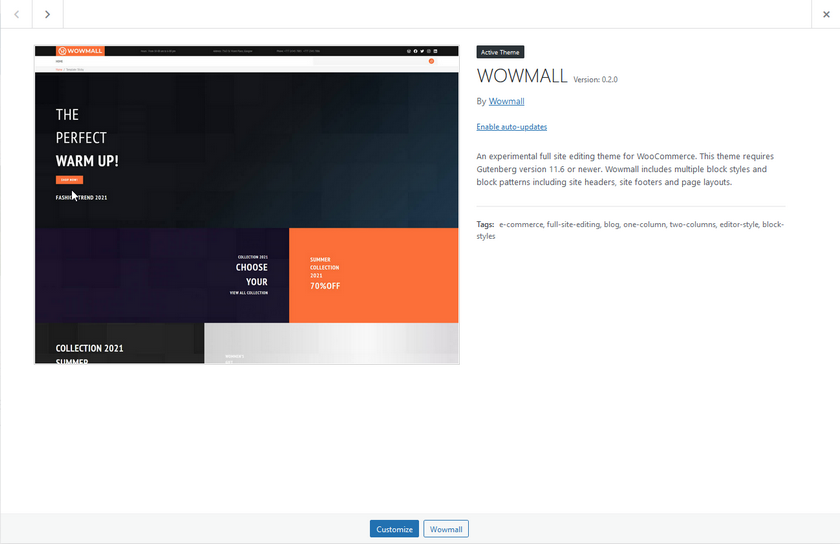
Once you activate your block theme, you will see a new Editor feature under the Appearance tab in your WordPress Admin Dashboard.
Click on it, and you should now see your full site editor.
Now you have full access to the fantastic block editing, block templates, dedicated WooCommerce blocks, and much more. You can check out the complete guide here for more information if you want to learn more about full-site editing and how to use it.
Conclusion
And that ends our guide on How to recover broken Gutenberg blocks. Let’s quickly summarize all the methods you can use to fix your broken blocks:
- Using the Attempt Block Recovery feature
- Convert to HTML block
- Convert to Classic Block
- Using the Resolve feature
- Recover multiple broken Gutenberg blocks programmatically
Now, it’s important to note that these methods can be used in different cases. The resolve feature won’t necessarily recover all your blocks, and you might need to fix your blocks at times manually. It’s also important to mention that a broken block doesn’t necessarily mean your content is broken. If your front-end loads perfectly, you might not have to fix anything. Moreover, if you have older WordPress pages that you don’t want to update because of broken blocks, it might be acceptable to let them be as is.
Have you ever encountered any broken blocks while working with the Gutenberg editor? What methods did you try to recover broken, broken blocks? Share your experience with us in the comments below. Also, let us know if you face any issues, and we’ll get right on top of it.
Additionally, if you’re looking for more guides on using the Gutenberg editor and how you can make full use of it, why not check out some of our other guides:
